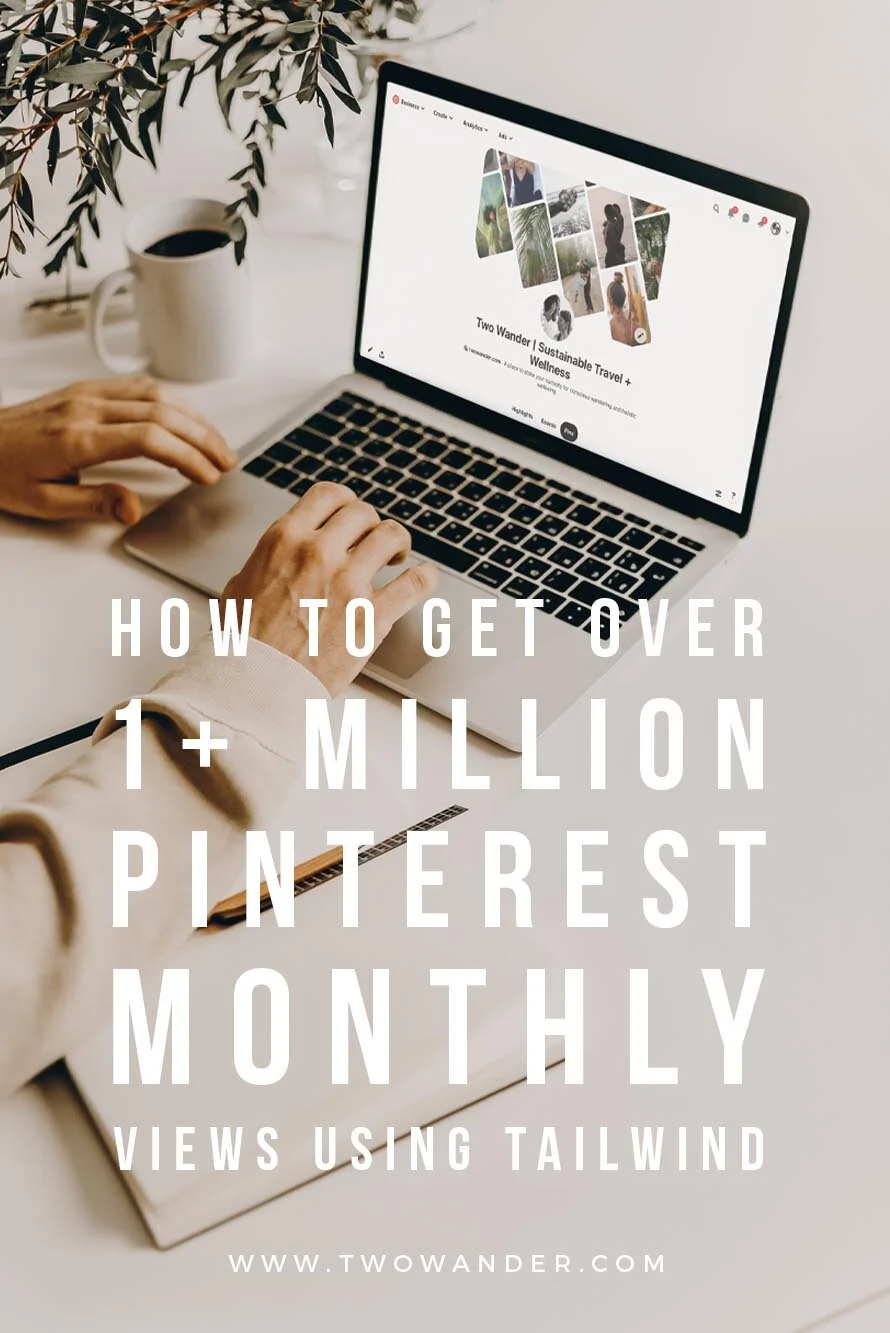
How To Use Tailwind For Pinterest: My Strategy To Get 1.3 Million Monthly Viewers In 2 Months!

Please note this post contains affiliate links. If you choose to purchase through these links, we receive a small commission at no extra cost to you. By using these links you are directly supporting Two Wander to continue providing content to stoke your curiosity for conscious wandering + holistic well-being. Thank you! [After this original post was created, we were subsequently compensated for it. All opinions remain our own].
How To Use Tailwind For Pinterest
I first signed up to Tailwind because it’s touted to be the best scheduling platform for Pinterest, and if you want your blog and brand to grow, you need to be successful with Pinterest marketing- it can drive up to 33% more referral traffic that Facebook! So far, Tailwind is one of the only OFFICIALLY approved partners of Pinterest and it was created specifically for this platform, so that right there is how you know you’re in for a winner! However, little did I know just how successful Tailwind would be for us in 2 months!
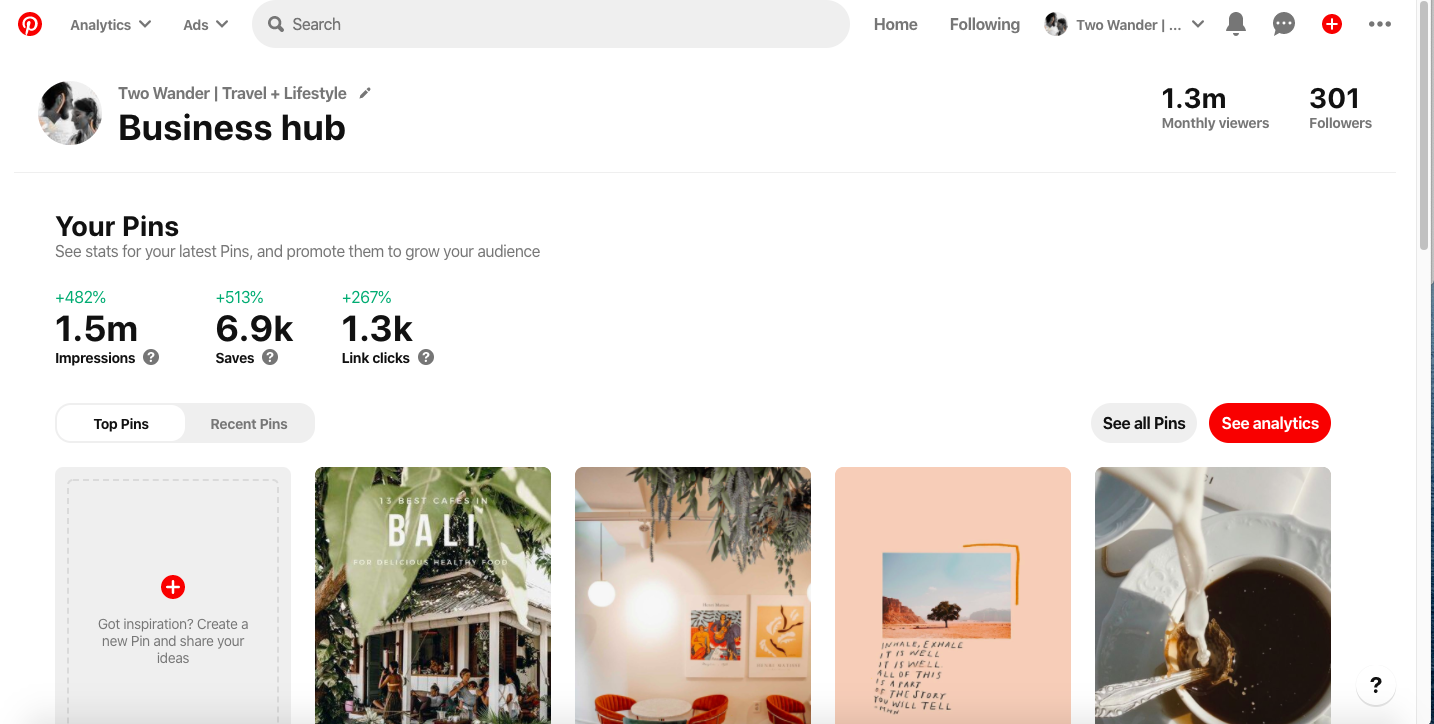
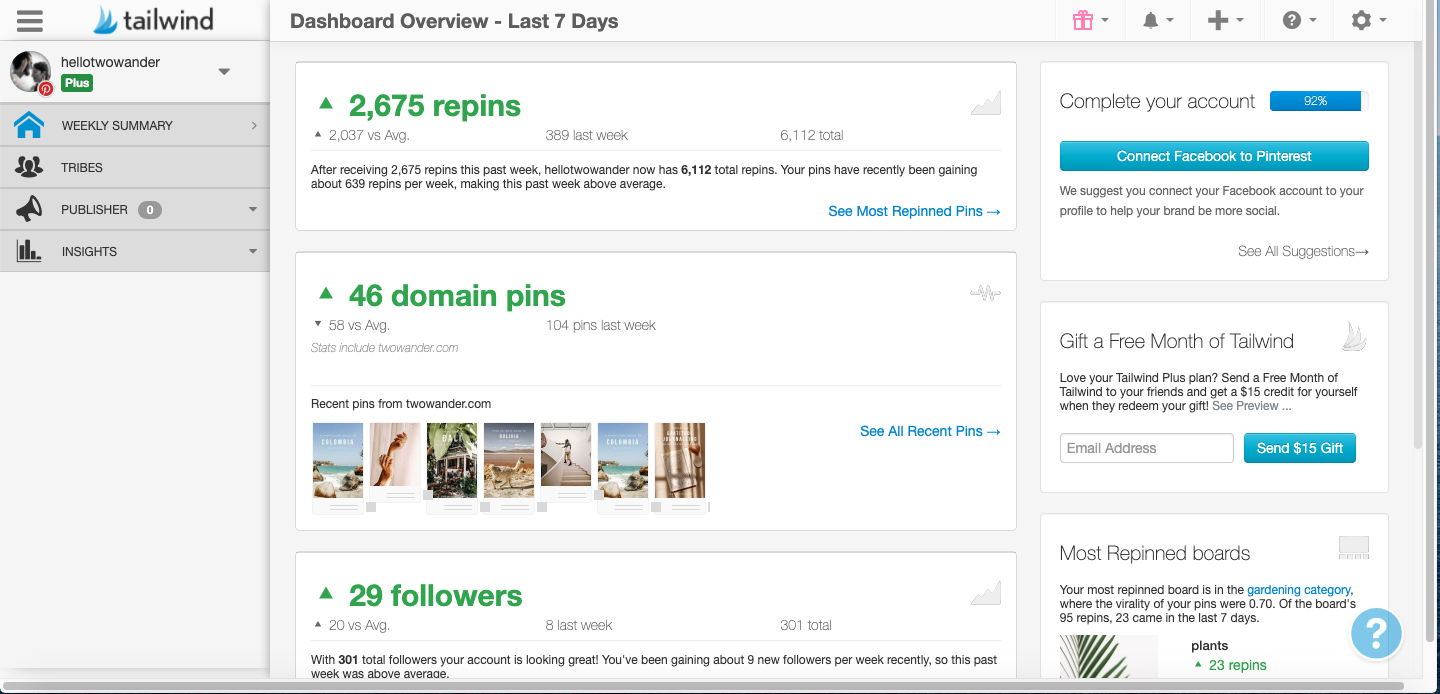
Our Pinterest traffic increased significantly in all areas: monthly viewers went from 8k to 1.3 million; impressions went from 15k to 1.7 million, as did total audience; and our audience engagements and engaged audience both grew from about 500 to about 50,000 per month each. Needless to say, Tailwind by far surpassed our expectations!
[UPDATE: As of June 2020 we had received 2.1 million monthly viewers! This had gone back down 600k in December 2020 due to time constraints meaning we couldn’t dedicate as much attention to it as we previously could and now generally hovers around 1 million as of 2024]
What can Tailwind do:
Schedule your posts (pins)
Post at the best times for your audience engagement
Automatically re-schedule top performing content at an interval you choose
Connect you with relevant Pinners to share content in Tailwind Communities and maximise reach
Create board lists for faster scheduling
Help drastically increase your impressions (views) by maintaining a constant presence on Pinterest
Measure your results and progress with detailed analytics
And ultimately help drive more traffic to your website!
You can now also create beautiful Pins directly in Tailwind with Tailwind Create! This is a super useful feature if you’re not comfortable with graphic design.
So read on below to find out how to use Tailwind for Pinterest and the strategy I personally used to achieve those stats after using it for 2 months- I’ll show you everything from optimising your Pinterest profile to how to get started with Tailwind and use it to your advantage:


optimize your pinterest account
First, you’ll have to start with a fully functional Pinterest account. Sign up and upgrade to a business account for free. Aim to have at least 10 relevant boards with at least 20 pins in each before you start. All boards need to have simple titles that are easy to search for, a detailed description of what’s contained in the board (you can use hashtags here too if you like) and a category selected (for example “home”, you can also create sub-categories within a board, such as “kitchen”), and then pick a clear, enticing photo for your board cover. Your boards will naturally grow over time- always make sure to keep your most popular/relevant boards on the top of your profile where people will see them first.
All pins you add to those boards also need a keyword optimised title, description including hashtags, and a URL. Don’t forget to mention your brand name in the title and description! You want people re-pinning your content to know who it originally came from (as the title and description can be altered, consider adding in your logo or website directly onto the photo/graphic as well). When creating content for Pinterest, make sure it’s always portrait, not landscape, as these will be more widely distributed, and, it goes without saying, it needs to be beautiful too! Don’t just pin for the sake of it.
Next, you’ll also want to join relevant group boards to maximise your exposure. You can find suitable ones either by looking on profiles of other people in your niche/who inspire you and seeing which ones they’re in, doing a search directly in the Pinterest search bar, or using Pingroupie. Then, you can select 5 of your best boards to go in the “featured” section at the top of your profile and decide which board you want your cover photo to display (or just “recently pinned”, which is what I go for).
Finally, sign up for rich pins if they’re relevant to you. Rich pins tell Pinterest whether your content is a product, recipe, article or app and will display it in a more user-friendly format. You can learn more about Pinterest rich pins here.
Once you’re all set up, you can start finding people to follow by checking out who similar accounts to yours are following and who’s following them, following specific themes or boards based on your keywords and following any other brands/companies/influencers etc. that you’re interested in! As you start to gain followers, try to always follow them back, if their content resonates with you, and as you become more active you’ll naturally find more accounts to follow. You can also find other members in your group boards and Tailwind Communities (more on that below) to connect with too.
Don’t forget to verify your website, and of course have a suitable profile pic and (keyword rich) “about” section too. If you already have an account, you can simply go back and optimise your Pinterest SEO a bit (but don’t delete any pins because you never know when one will go viral)!
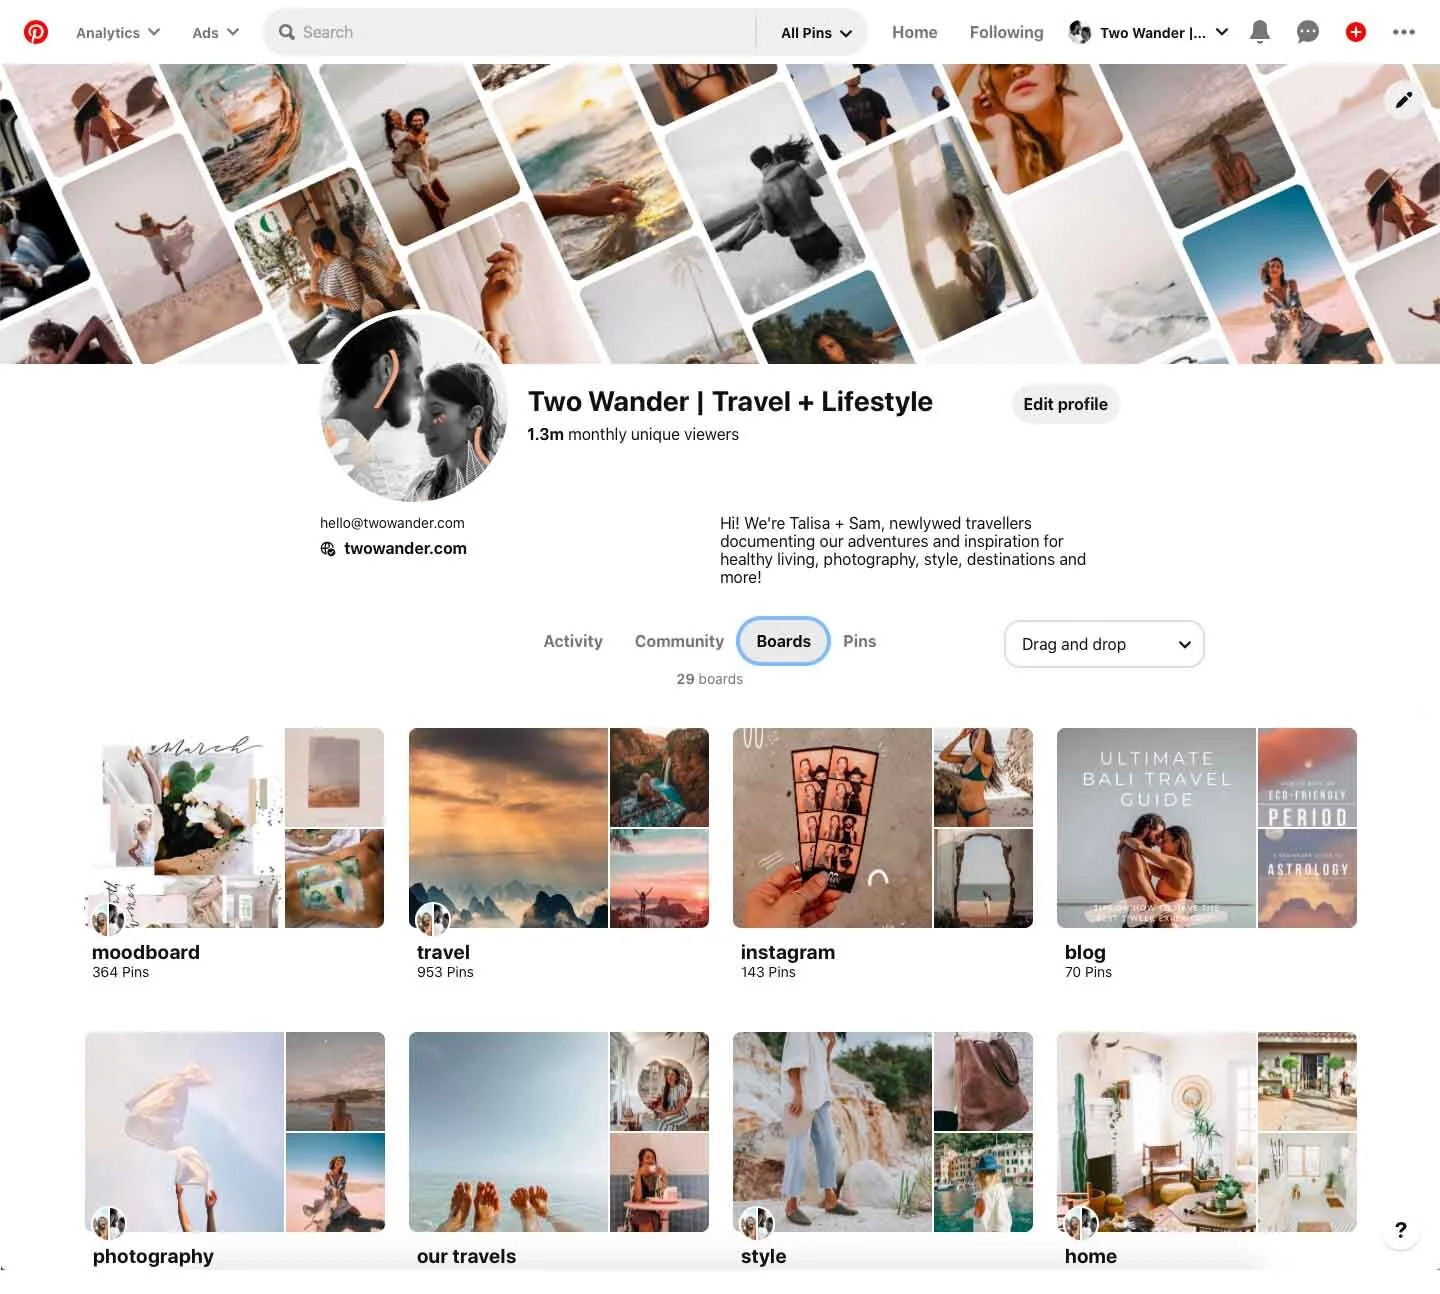
Click here to see our Pinterest page for an up-to-date example of how we lay out our boards and pins, the kind of content we create and re-pin, and who we follow.
joining tailwind
Tailwind is a scheduling tool that not only saves you time and helps you plan your Pinterest strategy and feed, but on average helps users get 6.9x more repins! Why does this matter? Well, first of all, because time is money, and let’s face it, while I absolutely ADORE Pinterest, it can be incredibly time-consuming, especially because it needs to be done every day (much like Instagram, which you can also do through Tailwind). It streamlines the process by allowing you to schedule your whole feed for a week, month, or more all in one go! I also like that I can see all upcoming pins in my feed in one place, including my own, others’, group boards, followers’ and Communities to see how it will look together.
Secondly, Pinterest is currently one of the biggest drivers of blog traffic and is the 3rd biggest social network in the US! If you own a blog or business, quite frankly you need to be on Pinterest, and, as we’ll see below, the success Tailwind can help you achieve in a short amount of time is more than you could ever do by yourself!
They also offer a free trial based on 100 scheduled Pins (not 14 or 30 days so you can take your time) with no credit card needed. This is a great way to test the waters and get comfortable with Tailwind before fully subscribing. Honestly, I also signed up for the free trial but then immediately subscribed straight away because I knew there was no other better platform out there for Pinterest, and that we were going to be on Pinterest either way so I may as well get started fully, and I’m so so glad I did. Of course, the outcome I achieved is just my personal results but Tailwind does also publish typical results of Tailwind members, you can see exactly what the average growth rate looks like here. Note that Instagram and Pinterest are separate paid subscriptions so bear that in mind when signing up.
Using Tailwind will initially take a little bit of learning and getting used to, but it doesn’t take too long and once you do it’s SO worth it (they have loads of guided videos you can watch, just make sure to enable javascript). I think I spent one day getting to grips with everything and scheduling in my new pins for the week and then I was done, now it’s second nature to me and I’m getting quicker and quicker with it. Plus, I’ve halved my time spent on scheduling Pins from before when I was using Pinterest alone and have not only seen our stats grow exponentially, of course, but it’s also been great to drive traffic to our website which now accounts for 68% of all referrals! Bearing in mind that we are also a travel + lifestyle website operating in a time when the world is on lockdown!
creating your Tailwind schedule
After taking you through the first steps of creating your Tailwind account (with prompts all along the way), you’ll want to set up your pinning schedule. The best way to do this is by using the automatically calculated optimal times for you based on your audience, I go for the recommended 20 Pinterest pins per day based on my niche. While this may seem like a lot, remember that Pinterest is a social media search engine that’s used for inspiration, so you shouldn’t be pinning just your own pins!
Unless you have a wide variety of stunning photography and content, your profile could get pretty boring for people if you’re not pinning other images too. After all, it is supposed to be like a type of mood-board. As with everything in business, and in life, most sources say to opt for the 80/20 rule- that is, 20% your own content and 80% others’ content, at least in the beginning until you build up enough of a variety of your own material (or up until 500 followers as some have suggested). Plus, it’s important for the Pinterest algorithm that you are social and use all features of their platform, which includes not only uploading content but also, of course, repinning. [Update: We currently pin about 15 times a day with a 50/50 ratio of our own content and others’].
When first creating your Tailwind schedule, you’ll only get about 4 optimal times a day, so to fill in the rest you can either select specific times yourself around the optimal times, or, if you delete a few time-slots and refresh the page, a suggested time will automatically appear (that is based off of your optimal time). This is what I do until all slots have been scheduled. It’s important for pins to be spaced out not only to keep a consistent presence in your followers’ feeds but also to not appear spammy! Make sure to spend some time getting this done properly because this will be one of the biggest contributing factors in your success (along with your actual content of course)!

adding pins to Tailwind
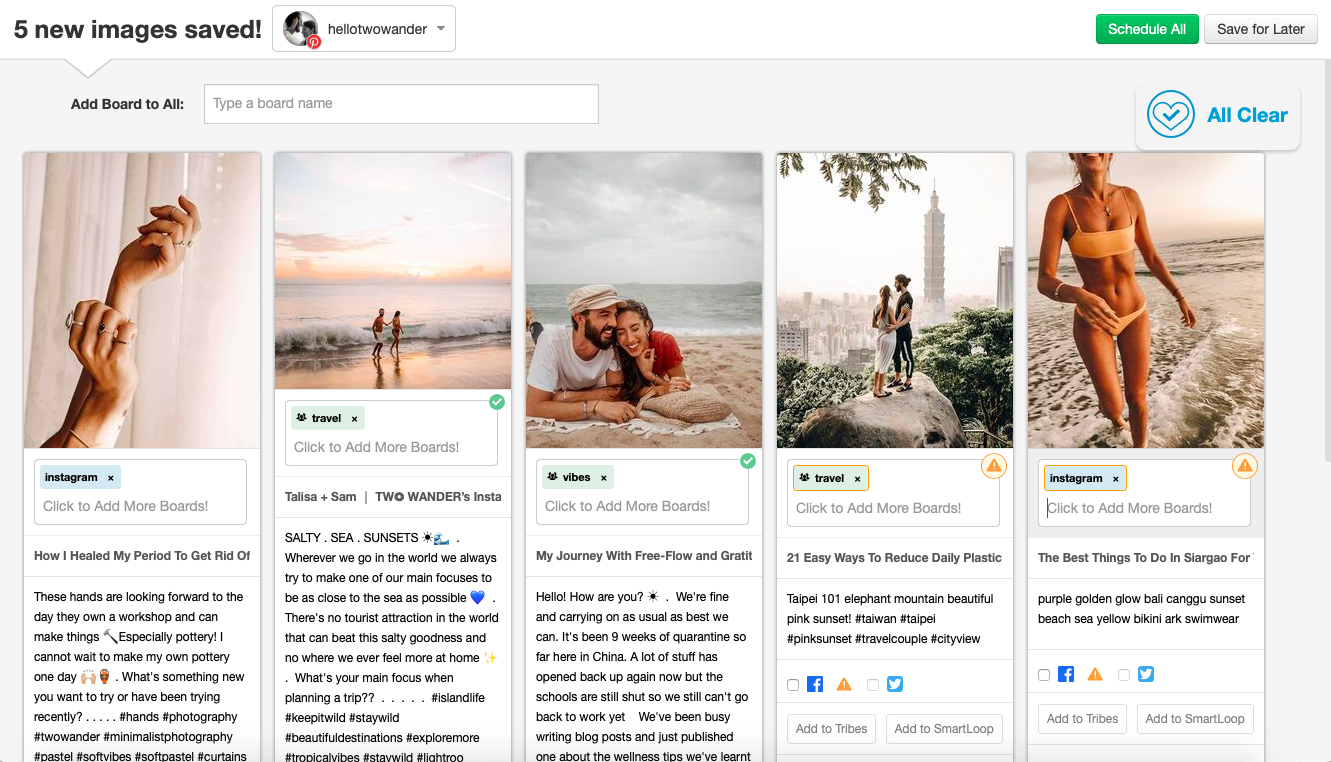
If you download the Tailwind extension app for Google Chrome, you can schedule pins directly from any website. This would normally be your blog posts- don’t forget to create 2-3 Pinterest optimized graphics at the end of each post for ease of sharing and testing what style people prefer. These should be 600x900 pixels, with clean, clear and aesthetically pleasing fonts, graphics and images. Make sure that your keywords are in the title ON the image, in the pin title itself and in the pin description, including hashtags, because Pinterest will crawl all of these (Again, Tailwind Create is a GREAT tool for this). If a keyword is in your URL and the board you’re pinning it to (and the description of that board and its category), even better!
You can also save from Instagram and any other webpage, or upload images directly from your phone/laptop in Tailwind. Once you click on the Chrome extension, you can select multiple images for batch scheduling (which is awesome) and a new window will pop-up where you’ll select the board, add a title and description, add it to Communities or a SmartLoop (more on this below) if you want, and change the URL if necessary.
After you’ve added your pins from your website or Instagram (or uploaded them directly), you can top off your remaining time-slots with some general inspo to fill out your boards. This is when I would go to my Pinterest account and schedule in my remaining pins from there using the “More Ideas” in my boards themselves, and I make sure to pin a couple of images to each board. You can also find related content directly on Tailwind’s Home Feed so you technically never even need to leave the platform!
Don’t forget to pin not only your own content, from your Tailwind Communities, group boards, and general inspiration pins from your Pinterest home page etc. but also to click on your followers’ list and give some love directly to them too! When pinning from others, always make sure the link is working correctly and leading to a reputable website first otherwise you could be penalised. It’s, again, important to the Pinterest algorithm that you use all of their features so pinning from multiple sources not only gives you varied content, engagement with your followers/following but it also keeps you in their best-practice books!
To make the pinning process even quicker, you can use “board lists”. If you’ve got a regular set of boards that you pin together to, you can create a board list to pin to all of them automatically. This is particularly useful for group boards. For example, if you join 7 group boards and then create 7 board lists with each of those groups on a one day interval, you can pin 1 pin every day for a week 28 times without it being overkill! You’ll need to check how active those group boards are to make sure a 1 day interval is enough, if not spread them out more accordingly (or if you’d like 1 pin to run for longer, a month say, you would need to create 30 board lists). It could take a bit of time to create your board lists but once they’re done they’re done and you’ll have loads of content automatically pinned in one click that’s evenly spaced out, saving you even more time down the line!
Once you’ve got all your pins scheduled for the week/month, you can lock some into place before “shuffling” your queue so that pins are distributed evenly. TIP: It’s really important to lock your brand’s pins into the first 5 slots of the day because these are given top priority by Pinterest! Also, if you’re pinning any content to group boards, some require as a rule that you also re-pin another user’s content so you’ll need to lock these two together to avoid being kicked out. It’s necessary to shuffle your queue a few times so that you don’t pin too many of the same or similar photos (of jewellery for example) in quick succession as that is not only spammy but also less aesthetically pleasing (remember Pinterest is a mood board)!
joining tailwind Communities
You may have heard about Tailwind Communities and these are a really great way of getting more traction for your pins. They’re basically like Pinterest group boards but on the Tailwind website, where you pin your own and share others’ content for more exposure. To find relevant Communities, type a keyword into the Community search-bar and check their activity level to make sure they’re active enough. Once you’ve joined your maximum 5 free Communities (which you can add onto with “power ups”) check back in weekly and monthly (you’ll also receive email updates if you opt in for these, which I recommend) on your Community dashboard to ensure they’re all working well for you.
Some Communities will give you more engagements and impressions than others but I think a variation is good, also make sure to give a Community enough time before deciding to make a switch. You can pin 30 times to your Communities per month for free or, again, purchase power ups. In the first 2 months of using Tailwind, our pins gained a reach of 300,000 thanks to my Communities by pinning only 47 times!
Some Communities can be joined automatically but others are exclusive and you have to request to join them, including a brief description about yourself and business (this is where good quality content matters). As it may take a while, you can also try to Google the name of that Community in quotation marks and “Tailwind Community” to see if you find an invite link directly. Another good way to find invite links is to check out the blog posts of the Community owner/creator related to Tailwind to see if it says anything there. Once you’ve been approved to a Community make sure to always follow its rules!
Don’t forget to not only re-pin/queue to your schedule an equivalent number of other members’ pins, but also to re-pin/queue a pin from anyone who re-pins/queues one of your pins at any other time as a courtesy if possible! You can also just send them a brief thank you message and check their Pinterest profile to see if you want to connect there too. There is a chat forum in the Community feed you can use as well to engage with other members as well.

looping your top performing pins
Another really awesome Tailwind feature is the ability to “loop” your top performing pins. You can check in your analytics which are performing well, or if you have some evergreen content you’d like continually pinned, you can create a loop list of all the boards you would like pinned to and how frequently and then add specific pins to that loop. I’ve currently set mine to go out to 3 of my most relevant boards on a rotation of once a month and have enough pins in each loop for 1-3 pins a day to be automatically scheduled indefinitely. As this number of automatic pins, or loops, goes up, you’ll also have less and less to manually schedule in each week, double win! You can add up to 250 SmartLoops for free, after which you can again purchase additional power ups.
This is such a great option to take advantage of so that you get the most bang for your buck with your content, after all- why spend so much time, energy and love on something only for it to be pinned once and potentially not seen to its full potential! In fact, it was thanks to the SmartLoop that we get our first “viral” pin! I had created a roundup list of the 13 Best Cafes in Bali and had already pinned it to our Travel board, group boards, and Communities but it was only after I scheduled it to a loop and it went to our Travel board a second time around that it took off! Now, it’s had a reach of 742,000 and been saved and clicked on 631 and 515 times respectively!
Checking your pin analytics in general whether you add to a SmartLoop or not is a great feature for you too see which kind of content resonates with your audience so you can keep creating more of the same. You can also see statistics for your boards, including group boards- this is an amazing tool to evaluate which are worth your time and what kind of boards your audience likes, so you can make sure you’re pinning consistently to them too! I also like that you can see how your individual pins are doing as well as what is being pinned most by others from your website. It’s a great tool to add alongside the analytics you get in Pinterest because the two don’t always overlap.
You can note in the picture below that all this growth is organic, but you can always add on to it if you want! However, with the success we’ve seen with Tailwind alone we don’t really think it’s necessary to purchase ads, unless maybe you have a big launch coming up and want to give it some extra oomph.

Tailwind plans and pricing
So after all of this, how much is it to be a part of Tailwind? They do offer different pricing plans but most bloggers and small businesses should be fine with the standard Plus plan (which is what we use).
Tailwind Plus plan includes:
Unlimited pin scheduling
Smart Schedule so your pins post at the best times
Bulk uploads
Analytics to evaluate your pins, profile, and Pinterest boards success
Website insights
5 Community memberships and 30 Community submissions per month
250 SmartLoop Pins (1 Pin to 1 Board = 1 Looped Pin)
One Pinterest account (to which you can add 2 collaborators)
All this is for $9.99 (£8) when billed annually, saving you $60, or $14.99 billed monthly (don’t forget you have a free trail of 100 pins too, and if you’re a non-profit organisation you can get an additional 50% off. There’s also a referral program)!
“PowerUps” are available starting at $4.99 per month for either Communities or SmartLoop. This is handy because you only pay for what you need. For example, you can test out a couple months to see if adding in extras is worth it for your growth or not without having to invest too much up front. You get to choose what works for you, if and when you want to. In general:
Communities will be most effective for new blogs trying to build traffic.
SmartLoop will be most effective for established blogs with lots of content.
However both are useful in different ways and you should definitely be using up your free submissions for both if you can!
You can also get additional plans if you need more advanced features by contacting help@tailwindapp.com directly.
If you’re ready to start your Tailwind journey and skyrocket your Pinterest traffic click here to sign up for your free trial and see what it can do for you!

So that’s my guide on how to use Tailwind for Pinterest and the strategy I used to get 1.3 million monthly views in 2 Months! I really hope it can be of some use to you, I’d love to hear about your journey in the comments section underneath. Or, if you’ve got any questions at all feel free to let me know, I’m more than happy to try and help :)
And of course, don’t forget to connect with us on Pinterest here and save the pin below!